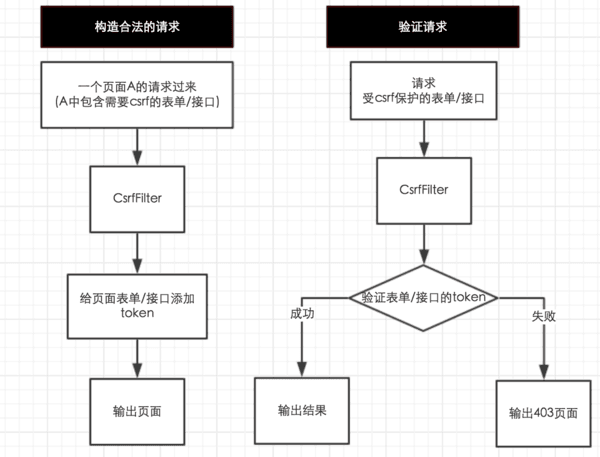
一、保护的过程
防御csrf的过程大致如下

1. 给页面表单/接口添加token
1
2
3
4
| public String doAction(Map context, CGI cgi) {
CsrfTokenRepository.setToken(context, cgi);
}
|
2. 在csrfFilter中检测token
1
2
3
4
5
6
7
8
9
10
| @Override
protected void doFilterInternal(HttpServletRequest request, HttpServletResponse response, FilterChain filterChain) throws ServletException, IOException {
if (!csrfToken.getToken().equals(actualToken)) {
response.sendError(403);
return;
}
filterChain.doFilter(request, response);
}
|
二、实现相关类

为了防御csrf攻击我们需要一个过滤器来对请求进行合法性检测,检测的标准是验证一个token,这个token由CsrfTokenRespository接口的实现类来生产和管理token
1. 实现CsrfFilter
参考org.springframework.security.web.csrf.CsrfFilter
1
2
3
4
5
6
7
8
| public class CsrfFilter extends OncePerRequestFilter {
private final CsrfTokenRepository tokenRepository;
private RequestMatcher requireCsrfProtectionMatcher = new CsrfFilter.DefaultRequiresCsrfMatcher();
private AccessDeniedHandler accessDeniedHandler = new AccessDeniedHandlerImpl();
|
2. 实现CsrfTokenRepository
改写org.springframework.security.web.csrf.CsrfTokenRepository
主要需要结合自己生产环境的模板引擎产出token
1
2
3
4
5
6
7
8
9
10
11
| public class HttpSessionCsrfTokenRepository implements CsrfTokenRepository {
public static void setToken(HttpServletRequest request, ModelMap context) {
CsrfToken csrfToken = (CsrfToken) request.getAttribute(CsrfToken.class.getName());
if (null != csrfToken) {
context.put("_csrf", csrfToken);
context.put("_csrf_header", "X-CSRF-TOKEN");
}
}
}
|
三、配置
我们编写的CsrfFilter如果是一个bean,那么实际上我们不能按普通的过滤器那样直接加入到容器中,而应该把它加入到spring-security的filterChain中,并且使用org.springframework.web.filter.DelegatingFilterProxy这个spring为我们提供的代理过滤器来将spring-security的filterChain嫁接到web容器的filterChain当中。

1. 添加依赖jar包
导入 spring-security-web 及 spring-security-config 两个jar包依赖
2. 配置web.xml
1
2
3
4
5
6
7
8
9
10
|
<filter>
<filter-name>csrfFilter</filter-name>
<filter-class>org.springframework.web.filter.DelegatingFilterProxy</filter-class>
</filter>
<filter-mapping>
<filter-name>csrfFilter</filter-name>
<url-pattern>{path}</url-pattern>
</filter-mapping>
|
3. 新增配置spring-security.xml
1
2
3
4
5
6
7
8
9
10
11
12
13
14
15
16
17
18
19
20
21
22
| <beans:beans xmlns="http://www.springframework.org/schema/security"
xmlns:beans="http://www.springframework.org/schema/beans"
xmlns:xsi="http://www.w3.org/2001/XMLSchema-instance"
xsi:schemaLocation="http://www.springframework.org/schema/beans
http://www.springframework.org/schema/beans/spring-beans-3.0.xsd
http://www.springframework.org/schema/security
http://www.springframework.org/schema/security/spring-security-3.2.xsd">
<http auto-config="true" authentication-manager-ref="fake">
<csrf/>
<custom-filter ref="csrfFilter" after="ANONYMOUS_FILTER"/>
</http>
<beans:bean id="csrfFilter" class="com.willowspace.security.CsrfFilter">
<beans:constructor-arg ref="csrfTokenRepository"/>
</beans:bean>
<beans:bean id="csrfTokenRepository" class="org.springframework.security.web.csrf.HttpSessionCsrfTokenRepository"/>
<authentication-manager id="fake"/>
</beans:beans>
|
四、抛弃spreing-security过重的filterChain
spring-security的filterChain中有很多filter,可以做很丰富的事情,一旦你使用了它,那么这些filter将都会被按顺序执行。如果你仅仅需要csrf防御,那么使用spring-security的filterChain对项目来说就太重了。我们可以如下使用自定义的原生filter来达到同样的目的。

1. 使用原生Filter
1
2
3
4
5
6
7
8
| <filter>
<filter-name>csrfFilter</filter-name>
<filter-class>framework.security.SimpleCsrfFilter</filter-class>
</filter>
<filter-mapping>
<filter-name>csrfFilter</filter-name>
<url-pattern>{path}</url-pattern>
</filter-mapping>
|
2. 由web容器初始化CsrfFilter
1
2
3
4
5
6
7
8
9
10
| public class CsrfFilter implements Filter {
private final CsrfTokenRepository tokenRepository;
public SimpleCsrfFilter() {
CsrfTokenRepository csrfTokenRepository = new HttpSessionCsrfTokenRepository();
Assert.notNull(csrfTokenRepository, "csrfTokenRepository cannot be null");
this.tokenRepository = csrfTokenRepository;
}
}
|
参考文档
- Using Spring Security CSRF Protection
- Cross Site Request Forgery (CSRF)


